
Published by SmokeyGood
If you love the rich wood-smoke flavor of outdoor cooking but absolutely despise the greasy cleanup that follows a long weekend session, you are not alone.
Many backyard enthusiasts get excited to buy a beautiful new Traeger, Weber, or Yoder, only to find out that smoking a single Pork Butt turns the inside of their expensive steel barrel into a black, carbon-crusted, greasy nightmare. Your drip tray gets filled with rancid fat, grease spills down into the bottom of the drum, and you end up spending hot Sunday afternoons sweating over a scraper blade.
Stop making such a mess!
Are you still smoking and grilling with your protein sitting directly on the factory grates? If the fat and carbon are building up on the bottom of your grill, it is time to pivot. Here is exactly how to use my Pan and Wire Rack System to keep your pellet grill looking brand new for life.
[As an Amazon Associate, I earn from qualifying purchases]
The No-Mess Toolkit: What You Need
To replicate this automated cleanup setup, you only need a few simple components from Amazon:
- A Heavy-Duty High-Rimmed Baking Sheet: Look for a commercial-grade aluminum half-sheet pan that can withstand high temperatures without warping.
- A Stainless Steel Nesting Wire Rack: This must fit perfectly inside your baking pan to lift your meat off the floor.
- Heavy-Duty Protective Foil: Standard kitchen foil is too thin and will tear too easily
- A Durable Grate Scrub Brush: A heavy-duty bristle tool to clean your wire rack in the sink in under 60 seconds.
The Step-by-Step No-Scrub Workflow
1. The Night Before Setup
Start the night before your cook. Take your commercial baking sheet pan and lay down a generous layer of Reynolds Brand Pitmaster Heavy Duty Foil along the bottom. Make sure it rides up the interior edges of the pan walls to catch every stray drop of grease.
2. The Non-Stick Drop
Drop your stainless steel nesting rack directly onto the protective foil. Give the entire rack a light, even spray with Pam Cooking Spray. This simple layer acts as a barrier, preventing your meat’s bark from permanently fusing to the metal bars during a 12-hour smoke session.
3. Start the Dry Brine
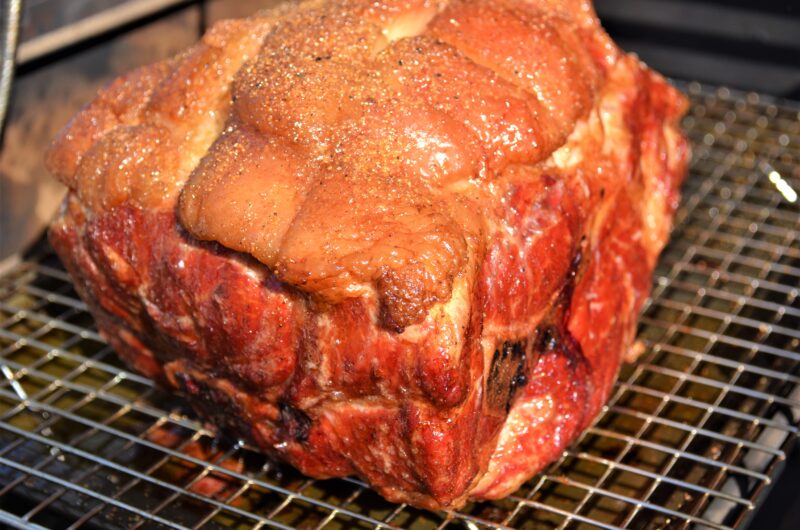
Place your protein directly onto the oiled wire rack and start your dry brining process. (Not dry brining your barbecue yet? It is the absolute secret to juicy meat—check out our deep-dive guide on Why You Should Dry Brine your protein to level up your kitchen game).
Cover the meat with a light, uniform sprinkle of Kosher salt. Be mindful here: don’t overdo it. More is not better in this case. With heavy, dense pieces of protein like a brisket or a thick pork butt, you can be much more liberal with the salt. But on a thinner piece of meat—like a rack of St. Louis ribs—keep it light!
4. The Refrigerator Rest
Tuck that big ole pan straight into your refrigerator for the night, or for a minimum of 6 hours. This allows the kosher salt to draw out surface moisture, dissolve, and penetrate deep into the muscle fibers, locking in the natural juices.
5. Morning Rub Application
If you are using a commercial rub, apply it the next morning right before the cook. Be incredibly careful not to use rub blends that contain high amounts of added salt in addition to your kosher salt dry brine, or you will end up with an oversalted bark.
6. Drop and Go
Fire up your smoker the next morning to your target temperature. Open the lid, drop the entire pan and wire rack system directly onto your factory grill grates, close the lid, and you are good to go!
Here is the Ultimate Win!
When your cook is finished, you will experience almost zero cleanup after a hard day at the pellet grill.
- No drip tray to empty.
- No scraping internal heat diffusers.
- No sweating it out on a hot afternoon with a putty knife.
Let the pan cool down completely on your counter. Once safe to handle, take it indoors into the air conditioning. Simply peel off the grease-filled heavy-duty foil, roll it up, and toss it right into the trash can. Clean the bare pan edges as needed.
To clean the wire nesting rack, grab a dedicated tool like this Heavy-Duty Scrub Brush on Amazon. Let the rack soak in warm, soapy water in your kitchen sink for 15 minutes. Thanks in part to that coating of Pam spray, the baked-on mess will slide right off the stainless steel bars with minimal effort.
Do this simple routine on every cook, and you will never need to scrape the bottom of your pellet grill again!
Recent Comments